Wednesday, October 31, 2012

My first Butter London!

Hello ladies!

I finally got my BL in the mail, darn storm. Speaking of the storm, I hope everyone is safe and no one was hurt. It was such a crazy storm. :( Things can be replaced, but people can't. Just remember that. ;)


So I picked Knackered as my first BL because it looked super pretty on the screen, and I'm pretty glad I picked it! It's a light purple duochrome base with micro holo glitter. I LOVE the application! It's really, really thin so it went on easily and dried super quick. The only problem with it is that it's super sheer. I used four coats and could still see the tips of my nails. :(


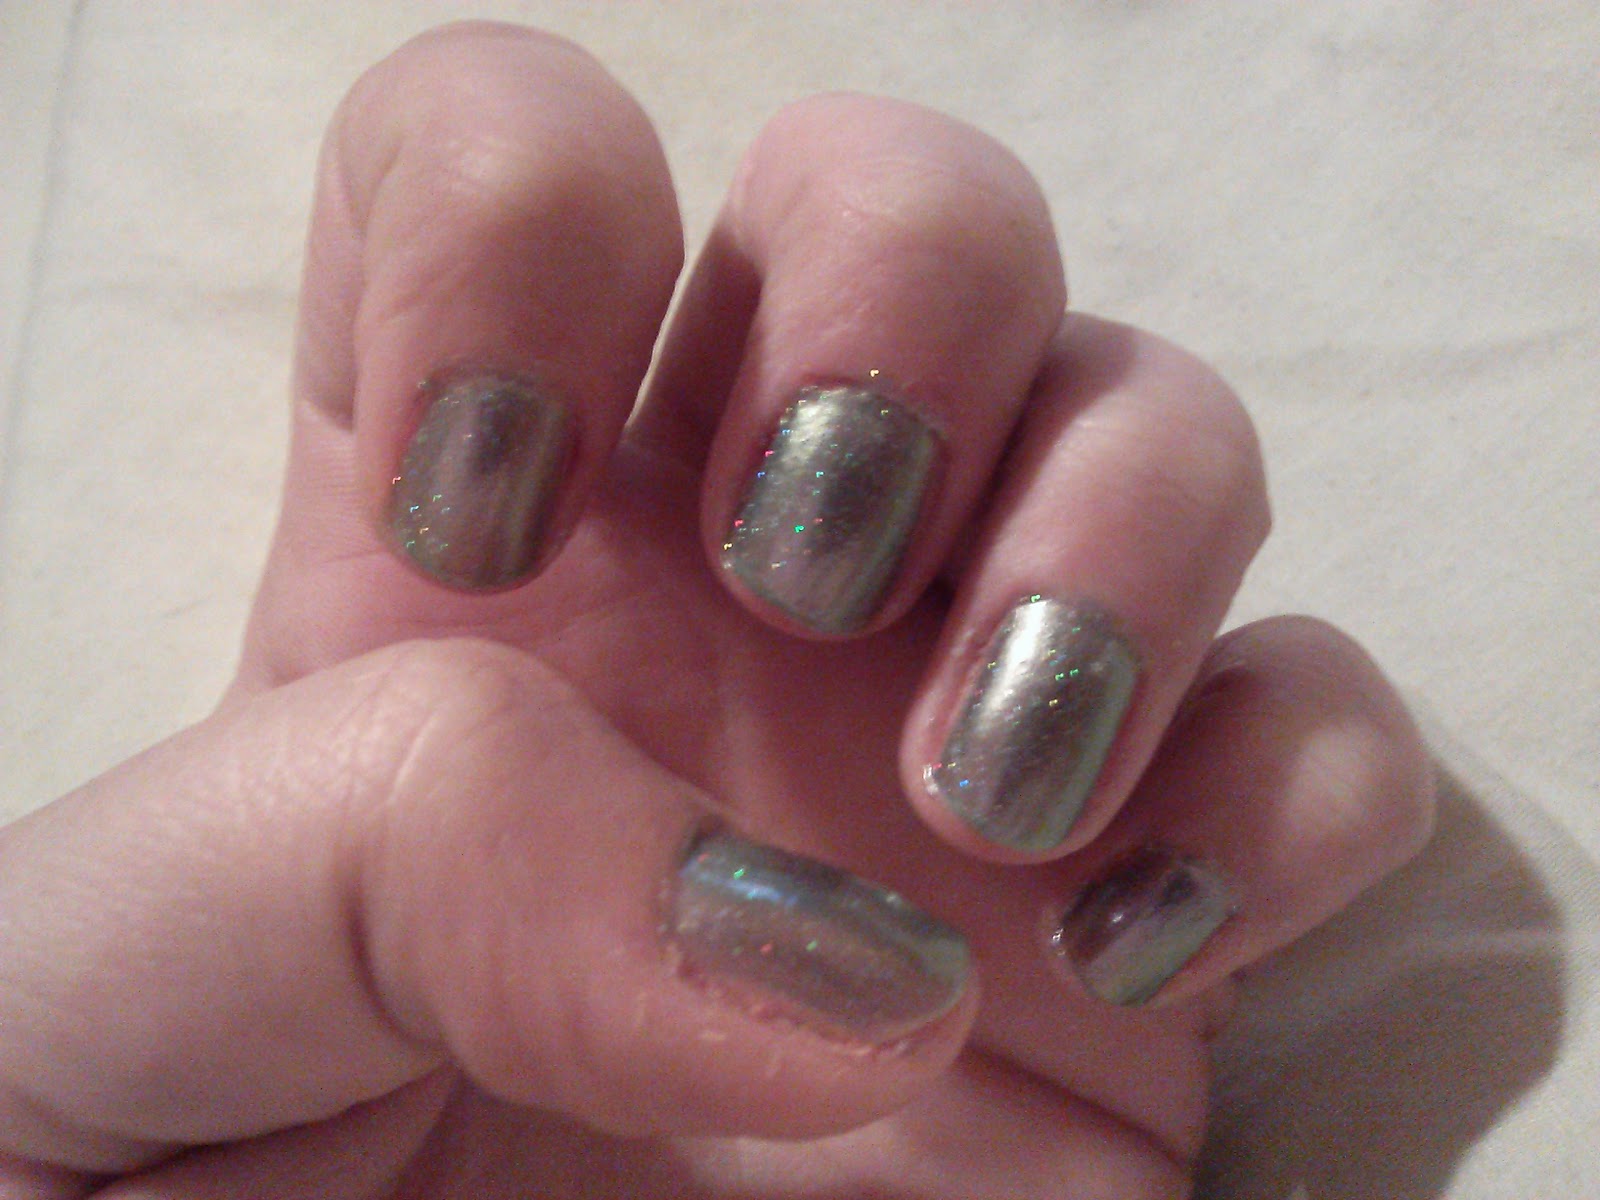
Both of these pictures are four coats of Knackered without a top coat.


 And these two are with a top coat (first picture with flash).

It's so pretty, but it's way too sheer for me. :( I'm going to try to find a good blue to wear under it, so maybe I'll update this post with that as an accent nail. Anyways, let me know about your favorite BL or if you liked Knackered.

And I hope you had a great Halloween!
Nicole  

Tuesday, October 23, 2012

Quick post ...Again!

I have been having such a hard time with my nails this week! I tried two different brands and colors of purple so I could do a purple/gold manicure, but the polish would NOT cooperate! No matter what I did, how many top coats I added, both of them chipped. BAD. Seriously, half of my nail polish peeled off on one of my nails. So after that I took a few days with my nails naked (felt so weird!) and finally got something to stick! So here it is:

 Wow, my cuticles are terrible! But anyways, I saw this dark blue (WAY darker than it looks in the picture) from my stash and thought I would do this! This lasted two days. Haha. I just finished doing my first Halloween manicure, so I'll be posting that hopefully tomorrow!

Have a great night!
Nicole

Friday, October 19, 2012

Influenster Beauty Blogger VoxBox 2012

Hello all,

I just finished reviewing my VoxBox on youtube, so I thought I'd post it here in case any of you wanted to see it. Ignore my voice, I have a terrible runny nose from my stupid allergies. And I'm sorry about the quality of the video, my webcam isn't that high tech. Haha.


I wasn't too happy with the candle because it smells like men's cologne, but luckily my Dad loved it so he'll use it. As for the fake lashes and the eye palette, I don't know what I'm going to do with those yet. I'm not the biggest fan of fake eye lashes but I've never used them, so we'll see. The NYC eye palette is too dark for my eyes and skin so we'll see about that as well. I'm excited to try the frizz control stuff, though. :)

Let me know if you got this VoxBox and if you like the products you receieved!

Nicole

Wednesday, October 17, 2012

My new favorite top coat!

Hello lovelies,

Today I have a quick post about Makeup Your Face's awesome holographic top coat, Interference. Yes, holographic top coat! I was so excited when I saw this polish and I ordered it as soon as I could!

Here it is over Essie's Da Bush:


This is with flash so you can see the holographic goodness! As for application, it went on great! It was a little thick but it was necessary as it covered the entire nail with one layer. It dried pretty quickly and I used a clear top coat to hold in the awesomeness. This manicure only lasted a few days because it happened to be cleaning week at work (yuck!) but I'm sure it lasts longer normally, especially depending on what you have under it.

This is my favorite new top coat and I'm going to be experimenting with it soon. Check Makeup Your Face's facebook and etsy pages to see more of their awesome nail polish and makeup!

Have a great weekend!
Nicole

Thursday, October 11, 2012

Crazy Busy Week

If anyone reads this blog at all, you've noticed that I haven't posted in 8 days. I'm so sorry! I finally got the hours I needed at work but more hours = less nail and blog time. I got some sloppy pictures of a great mani I did before I got super busy, so here goes nothing!


So I started off wanting to do a lacy type manicure, but I do not have the skill set for that. So this is what happened. I got both of the polishes (Essie Turquoise & Cacaios and Penny Talk) in the mail and they looked so great I had to do a mani. As always, excuse my horrible cuticles and clean up job.


So I started off with two coats of Turquoise & Cacaios on all of my nails, but some of them still had bald spots and my slight OCD wouldn't let me keep them that way so some of them had three coats. For the tips and the lines on the bottom of the design I used tape. Then I used my second smallest dotting tool to make the lines between them. Voila! You have a weird Aztec type manicure. This is one of my personal favorites. :)

I'm sorry I've been so busy this past week and that I wasn't able to post the Wednesday Breast Cancer Awareness manicure. I swear I'll try to post more this week! Thanks for keeping up with my blog, if anyone is.


Nicole

Wednesday, October 3, 2012

Breast Cancer Awareness Wednesday

Today instead of swatching my magnetic nail polish, I'm going to start my Breast Cancer Awareness Wednesday manicures. If you want to join, go right ahead! For the month of October, I'll be posting a new manicure every Wednesday that has something to do with pink and Breast Cancer Awareness. I wanted to do something simple for this week, but maybe next week will be a little more exciting.


Please ignore my TERRIBLE cuticles and clean up job. I just got super duper lazy. Haha. I used two coats of Wet 'N Wild Megalast Candy-licious for the base and for the ribbon, I used Sally Hansen Xtreme Wear Twisted Pink. You seriously don't even want to see the ribbon on my right hand (horrible!). I'm still learning how to do nail art with my left hand since I'm right handed. Tomorrow I'll try to show you my new favorite polish, KleanColor's Blue Eyed Girl. It's just gorgeous and I've gotten many compliments on it. :)

See you tomorrow!
Nicole

Tuesday, October 2, 2012

Nail Mail/Haul

Hey guys!

Sorry I haven't posted in a few days, work has kept me busy (even though I need more hours, but who doesn't?). But today was such a great day that I had to share. If you haven't heard, Essie's have been popping up for really cheap at Ross as well as tons of other nail polish. I had set out to Walgreens for one polish but I couldn't resist going to Ross. When I got there, I did find Essie's! I found two packs of 3 polishes at $8.99. Essie polishes are usually $8 for ONE polish, so this was just a steal!


 Here's Everything:

Essie's from Ross:
From left to right: Top row - Braziliant, Super Bossa Nova, and Smooth Sailing
   Bottom row - Wild Thing, Silken Cord, and Antique Rose

Nail Mail!
From left to right: Jessica Brilliance Top Coat, Jessica Silk Nighty, Revlon Siren,
Nabi Magnetic polish in Ocean Blue and Essie A Cut Above

From CVS & Walgreens
Left to right: Fantasy Makers Go With the Glo, Wet 'N Wild Megalast in Candy-licious and Heatwave,
 and Sally Hansen Hard as Nails Xtreme Wear in Twisted Pink 

 As you can see, I got a ton of stuff today; and probably spent WAY more than I should of. But oh well, you can't go wrong with nail polish. ;)

Here are the deals I got: two 3 packs of Essie polish for $8.99 each at Ross, Nail Perfect kit for $2.49 at Ross (it's so cheap because it's missing the nail decals), Eyelash Curler for $1.99 at Ross, Fantasy Makers Go With the Glo glow in the dark top coat for $1.99 at CVS, Wet 'N Wild Candy-licious and Heatwave at $1.99 for two (buy one get one free) at CVS, and Sally Hansen Hard as Nails Xtreme Wear in Twisted  pink for $2.49 at Walgreens. Be sure to get a CVS and Walgreens card to get in on the savings, and definitely visit Ross for great deals!


I hope your Monday is going great and that your week follows. See you tomorrow with a swatch of the Nabi magnetic polish!

Nicole 

Sunday, September 30, 2012

Awesome Giveaway

I just wanted to tell you guys about this great giveaway that's being hosted by Laces and Lacquers. Be sure to head over there to enter and congratulate her on 1,000 fans!


http://www.laceandlacquers.com/2012/09/lace-lacquers-1000-facebook-likes-super.html?showComment=1348981926303#

Saturday, September 29, 2012

Nail Polish Rack

As promised, today I'm going to explain how to make a nail polish rack. Here's what mine looks like:


My nail polish collection isn't as large as I'd like it to be, but it's getting there. I love having the top part of it to put my nail polish removers, foot cream, etc. It helped so much with my organization! You can't see it in the picture, but I have little 'buckets' with the extra stuff that I couldn't find a place for in the rack; i.e. nail stickers, tip guides, etc.


Here's a link to the video I used to make my rack:
https://www.youtube.com/watch?v=v-QmkFhLfHg. She made it look SO easy, but I promise you it's way harder than it looks.

Here's what I used to make my rack:


3 pieces of black foam board ($2.88 each at Walmart)

Ruler
A small hot glue gun ($3 at Dollar General)
An extra bag of glue sticks ($1.50 at Dollar General)
A box cutter (my Dad had some in his tools)
Duct Tape (optional; I decided to use some AFTER I made the rack. Big mistake)

In the video she used an exacto knife but I thought my box cutter would work much better because it was able to cut through the foam board with just one cut.


Instructions:


1. On one foam board, make 5 inch markings all the way down on both sides. If you measure correctly you should have 5 lines. Connect the markings. This will be the back of the rack.

2. Take the second foam board and measure seven 2 inch strips on both sides. Connect the markings. These will be the shelves.
3. Cut the shelves off of the second foam board using your box cutter or exacto knife.
4. On the same board you cut the shelves out of, measure seven 1 inch strips on both sides and connect them. These will be the pieces that prevent the nail polish from falling off the shelf.
5. Cut those 1 inch pieces using your box cutter or exacto knife.
6. Take the third board and measure two 2 1/2 inch strips. Connect the markings. These will be the sides of your polish rack.
7. Cut the sides out of your foam board.
8. If you have decided to use duct tape, wrap your 1 inch pieces in them. (As I said, I decided to use duct tape after I build the rack and it likes to fall off so I had to hot glue them on.)
9. This is the most time consuming part. Pick up the first foam board with the 5 inch markings on it. Hot glue the seven 2 inch strips on the markings. You'll have to hot glue the side of the pieces to the board and then hot glue on the bottom for extra strength.
10. Hot glue the two 2 1/2 inch pieces to the side of the board. I found that it holds better if you put the glue on the side of the first foam board as well as a few of the shelves instead of on the sides themselves.
11. Now it's time to hot glue the duct taped pieces (seven 1 inch strips) onto the shelves. The easiest way to do this is to put hot glue on the bottom of the strip and also the two sides.
12. After all of the pieces are glued and the glue has dried, check to make sure your rack is sturdy and that no pieces are semi-on or semi-falling off. If you need to, put extra hot glue in places to make it more sturdy.
13. To hang the rack up, I used 4 screws: 1 about an inch away from each corner.

Voila! You now have a beautiful, organized polish collection. It's soooo much easier to see all of your pretty colors this way.

Some people have made theirs out of wood, but I personally didn't want to pay that much for a simple polish rack. I've had mine up for about two weeks now and it's still pretty sturdy.


Hopefully you guys will enjoy having a polish rack as much as I do. I'm like obsessed with it now! Have a wonderful weekend!


Nicole

Late Night Mani

Hello nail addicts!

I got bored so I decided to do a mani with the Sinful Colors Kissy I got today. It isn't the best, but I sorta like it. Please ignore my horrible cuticles and clean up job. I have cuticle oil and nippers coming in the mail soon!


Here's the mani:


I used one coat of L.A. Colors Basecoat/Top Coat, two coats of Sinful Colors Mint Apple, one coat Sinful Colors Kissy for the accent nail and dots, and a top coat of the same L.A. colors polish. To make the dots I used my dotting tools, but you can use a bobby pin or toothpick if you don't have any.


I also did some swatches of Sinful Colors Mint Apple and Kissy.


                               From left to right: One coat of Mint Apple, two coats of Mint Apple,                        one coat of Kissy, and two coats of Kissy.
This is without a top coat.

I love Sinful Colors because the nail polish is so inexpensive and it always goes on great. I had no trouble applying either polish; both were opaque with two coats. The first coat of both polishes had some bald spots, as you can see in the picture, but they were all covered up with the second coat. In the pictures, Kissy looks a lot more blue than it actually is. The polish is actually more of a 'Christmas green' with silver and green sparkles.

Have a wonderful night, lovelies.
Nicole

Friday, September 28, 2012

Happy Friday!

Today is a great day! I got nail mail from swapping nail polish on one of my facebook groups. The one on the left is China Glaze Stone Cold from The Hunger Games collection and the one on the right is Essie in Watermelon. My first Essie, I'm so excited! I'll be doing a swatch of the China Glaze soon and I think I'll do some nail art with the Essie. I also bought Sinful Colors Kissy today at Walgreens but the brush broke off so I'll be exchanging it very soon. But I'll do a swatch of that one soon as well.

Tomorrow I'll be posting all about my lovely new nail polish rack. It definitely makes it easier to see my polishes. I hope you'll enjoy it!

Until then, have a wonderful weekend!
Nicole

Thursday, September 27, 2012

Welcome to my blog!

Hello everyone!

I have decided to take my nail polish addiction online and make a blog. While I am not a pro in any sense of the word, I do know how to do some stamping and nail art. I'm learning, though! As I learn, maybe you will too. :) Please bare with me while I learn how to blog correctly and learn new techniques. I hope you enjoy this blog as it comes along.

Thanks for reading!
Nicole